Mailchimp for post-quiz email marketing
Connect your product quiz to Mailchimp, segment leads by customer tags, and trigger personalised email automations. Setup, by platform.
Connecting your product recommendation quiz to Mailchimp turns every completion into a segmentable lead for customer segmentation: the customer’s email and the tags from their quiz answers flow into a Mailchimp audience, you build segments against those tags, and Mailchimp’s automation fires the personalised follow-up sequence. The integration works directly on Shopify Legacy, WooCommerce, Magento, BigCommerce and Standalone. The Built for Shopify version of the app doesn’t currently support direct Mailchimp connection. For stores on Built for Shopify, the recommended path is Klaviyo (or Shopify Flow for Shopify-native automation).
What you'll learn
- 01Which platforms support direct Mailchimp connection (everything except Built for Shopify), and what Built for Shopify stores should use instead.
- 02The 3-step Mailchimp setup: connect the quiz, link customer tags to choices, build the audience-segmented email automations.
- 03The Mailchimp API's 3-field limitation (email, name, customer tags only) and the customer-tag workaround that captures detailed quiz data anyway.
- 04A worked skincare example: how to tag answers, segment in Mailchimp, and design a 3-email follow-up sequence.
For the broader segmentation-and-flow architecture that makes any post-quiz email work, see how Klaviyo segmentation unlocks once zero-party data lands in profiles. For the customer-tag design that powers the audience filters in Mailchimp, see how to use customer tags in product quizzes.
Table of contents:
- Platform availability
- How the integration works
- Setting up the Mailchimp connection
- Worked example: a skincare follow-up sequence
- Frequently asked questions
- Where this fits
Platform availability
The Mailchimp integration is available with one important caveat: direct connection isn’t supported on the Built for Shopify version of the app. If you’re on Built for Shopify, see the alternatives in the next section.
Capability matrix
| Capability | Built for Shopify | Shopify Legacy | WooCommerce | Magento | BigCommerce | Standalone |
|---|---|---|---|---|---|---|
| Direct Mailchimp connection | No | Yes | Yes | Yes | Yes | Yes |
| Customer tags as Mailchimp tags | Via workaround | Yes | Yes | Yes | Yes | Yes |
| Webhook to Mailchimp API | Yes | Yes | Yes | Yes | Yes | Yes |
| Zapier route | No | No | Yes | Yes | Yes | Yes |
| CSV export from Metrics | Yes | Yes | Yes | Yes | Yes | Yes |
| Shopify Flow alternative | Yes | No | No | No | No | No |
| Klaviyo alternative | Yes | Yes | Yes | Yes | Yes | Yes |
If you’re on Built for Shopify
Three options, in order of recommendation:
- Use Klaviyo instead. Klaviyo is the strongest ecommerce email platform for tag-driven segmentation and works natively on every RevenueHunt version including Built for Shopify. Segmented Klaviyo campaigns earn over 3x the revenue per recipient of generic sends (Klaviyo segmentation benchmark), and across the platform 1 in 5 quiz-attributed orders lands more than 30 days after the quiz (benchmark report). See how Klaviyo segmentation unlocks once zero-party data lands in profiles for the full playbook.
- Use Shopify Flow for the immediate post-quiz follow-up. Shopify Flow is free, built into Shopify, and triggers on every new customer-tag combination from the quiz. See how to automate post-quiz emails using Shopify Flows.
- Use a Mailchimp workaround. Export quiz responses as CSV from Metrics → Responses and import into Mailchimp, or use a webhook to push selected fields into Mailchimp manually. Less elegant but it works.
The rest of this guide covers the direct connection flow for Shopify Legacy + WooCommerce + Magento + BigCommerce + Standalone.
How the integration works
The flow is a 3-step pipeline:
- Quiz leads sync automatically. Every completion pushes the customer’s email, name and applied customer tags to your selected Mailchimp audience list.
- Tags become segments. Inside Mailchimp, you filter the audience by tag combinations to define each segment (e.g. customers tagged with
oily_skinandacne_concern). - Segments trigger automations. Mailchimp’s Automations engine fires an email sequence for each segment, with templates that reference the customer’s stated preferences directly.
Industry context for the value here: segmented Klaviyo campaigns earn over 3x the revenue per recipient of generic sends (Klaviyo segmentation benchmark). The same compounding logic applies to a well-segmented Mailchimp setup; the integration depth and ecommerce-specific tooling are different, but the segmentation-driven personalisation lift is the same shape.
Setting up the Mailchimp connection
Before you start: Make sure you’ve built a quiz already. If you haven’t, the first quiz video guide walks through the basics. For the foundations of a high-converting quiz, see how to build a successful product recommendation quiz.
1. Connect your quiz to Mailchimp
In the Quiz Builder:
- Open the Connect tab.
- Find the Mailchimp section and click Connect. A Mailchimp login window opens in a new tab.
- Log in to Mailchimp and click Allow to authorise the connection.
- Once you see “Mailchimp got connected, please close this window”, close the popup and refresh the Connect tab.
- Pick the Mailchimp audience list that should receive new quiz leads from the dropdown.
- Choose the default subscriber status (subscribed / pending / unsubscribed). For most stores, “subscribed” is the right default; for strict EU GDPR setups, use “pending” with a confirmation email in Mailchimp.
- Click Publish in the top-right of the Quiz Builder to push the change live.
Tip
Test the connection by taking the quiz in preview with a sample email. Use the youremail+test1@example.com trick (Gmail and most providers route +anything back to the base inbox) to run multiple test paths through the quiz without juggling separate inboxes.
2. Use customer tags for segmentation
This is the most important part of the setup. The Mailchimp API only accepts email, name and customer tags from the quiz. Detailed quiz answers, recommendations, phone numbers and custom fields don’t sync directly. The workaround: use customer tags to represent every quiz answer that should drive segmentation downstream.
For each answer choice that should influence the email sequence, attach a descriptive tag in the Quiz Builder. A customer who picks “oily skin” gets tagged oily_skin; “acne concern” gets acne_concern; “budget tier 2” gets budget_2. When the customer completes the quiz, all their tags flow into Mailchimp on the same lead record, which gives you the structured filter logic for the segmentation step.
For the full customer-tag setup workflow (which differs slightly between Built for Shopify and the legacy / multi-platform versions), see how to use customer tags in product quizzes.
3. Design audience-segmented email automations
With tags flowing into Mailchimp:
- In Mailchimp, open Audience → Tags to see the tags coming in from the quiz.
- Create Segments that combine the tags into meaningful audiences (“Curly + Dry Hair Customers” = customers tagged with
curly_hairANDdry_hair). - Build Automations (Mailchimp’s email-flow engine) that trigger on tag conditions or new subscriber events.
Fig. 01 Mailchimp Automations dashboard with tag-triggered sequences. Each Audience tag from the quiz can drive its own segmented automation flow.
Design email templates that reference the customer’s tag-implied preferences directly in the subject line and body (“Your routine for oily, acne-prone skin”). Generic newsletter templates underperform tag-referenced ones on every metric.
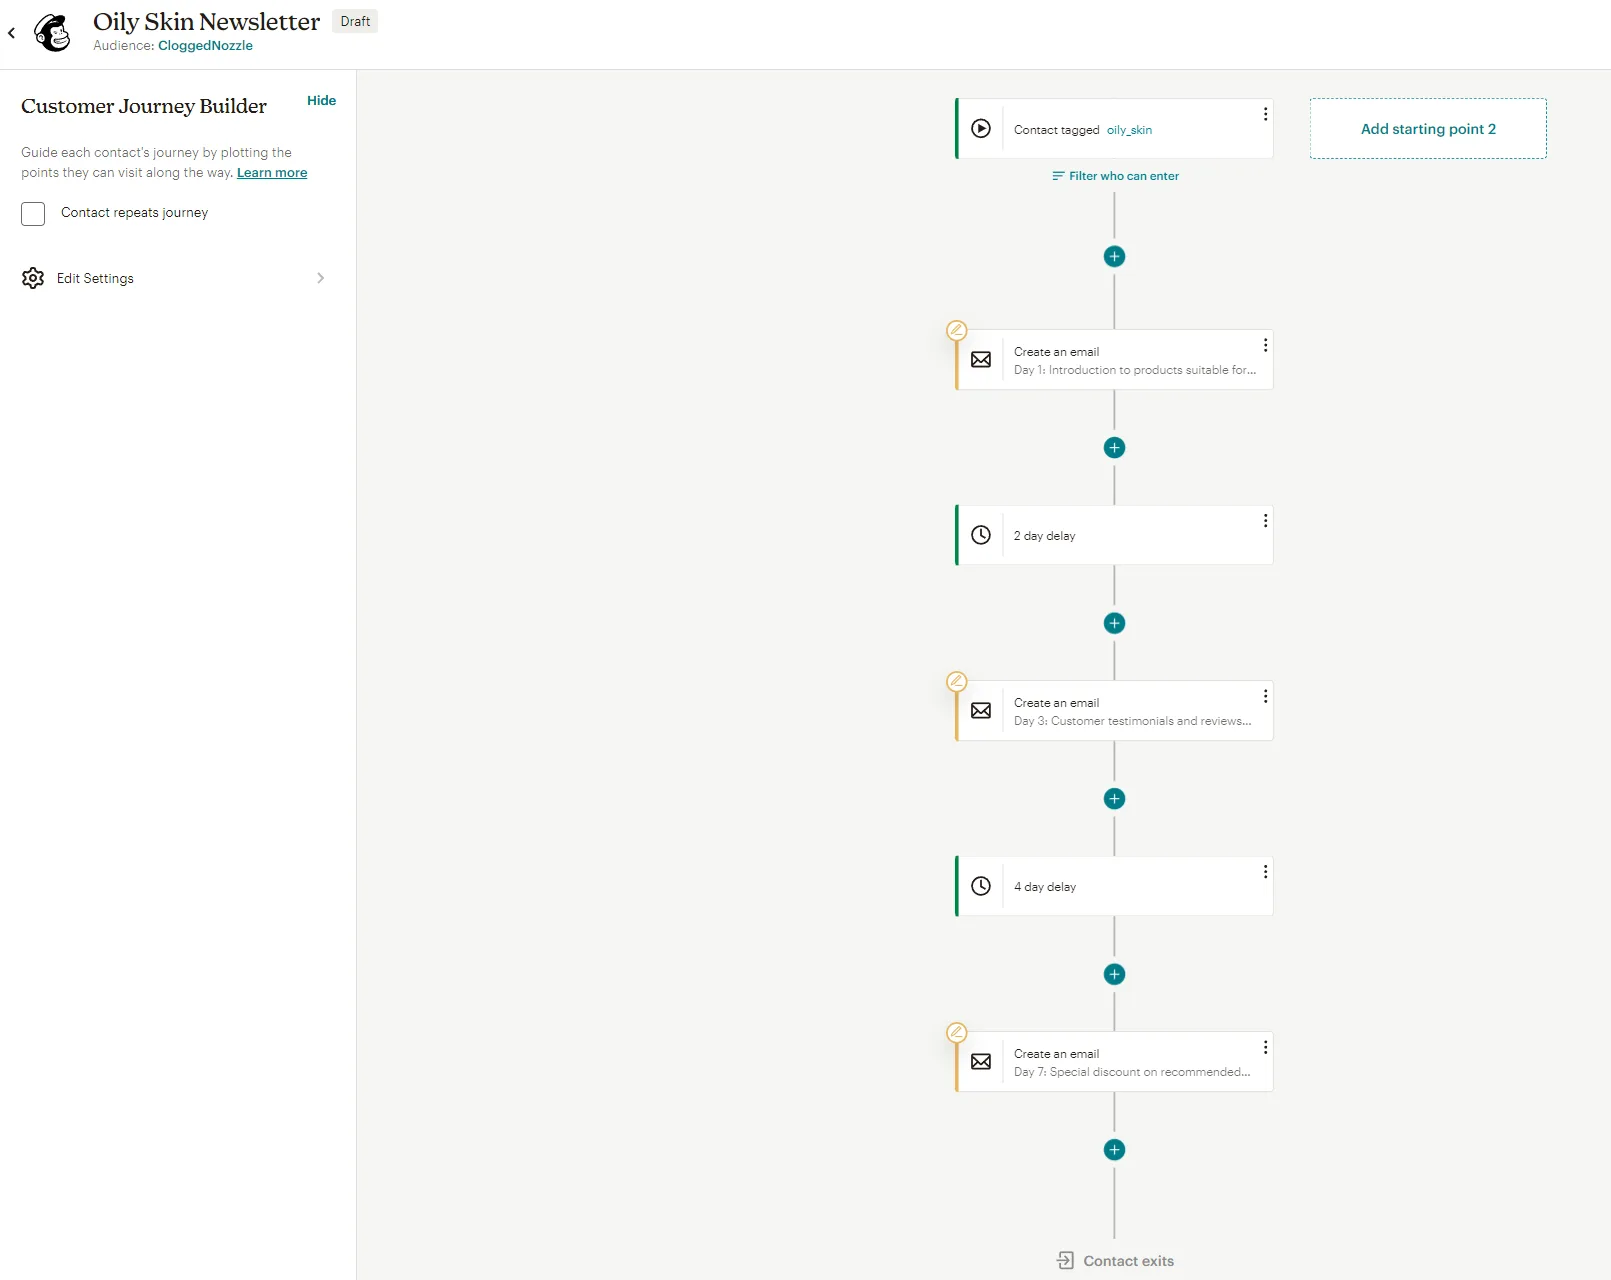
Fig. 02 Mailchimp template editor showing a tag-targeted product recommendation email. Subject line and body reference the customer's stated quiz preferences directly.
Worked example: a skincare follow-up sequence
Imagine you run a skincare ecommerce store. Your quiz asks about skin type and concerns. Based on answers, customers get tagged oily_skin, dry_skin, combination_skin, acne_concern, aging_concern, and so on.
In Mailchimp, you build a 3-email automation targeting the oily_skin segment:
Day 1: Introduction to products suitable for oily skin.
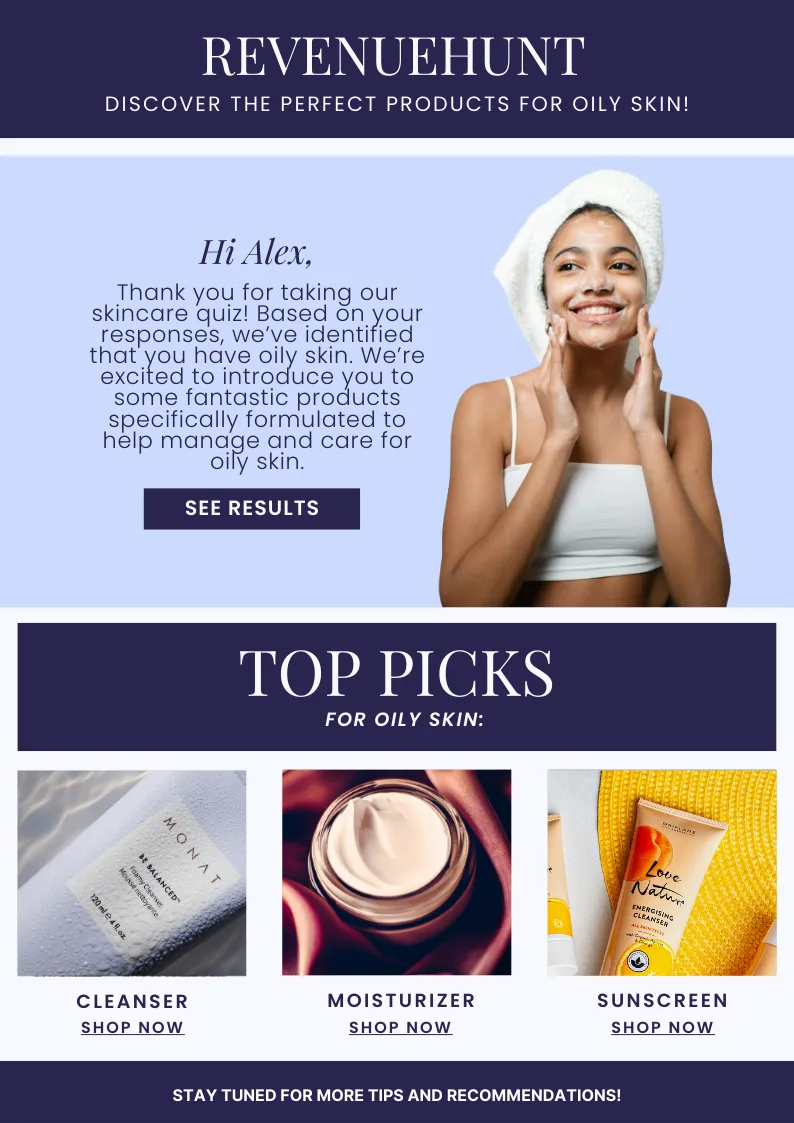
Fig. 03 Day 1 email: introduces the oily-skin product picks. The subject and copy reference the segment directly so the customer recognises the recommendation matches their stated profile.
Day 3: Customer testimonials and reviews for oily-skin products.

Fig. 04 Day 3 email: social proof. Testimonials from customers with the same oily-skin tag close the trust gap between the recommendation and the purchase.
Day 7: Special discount on recommended products for oily skin.
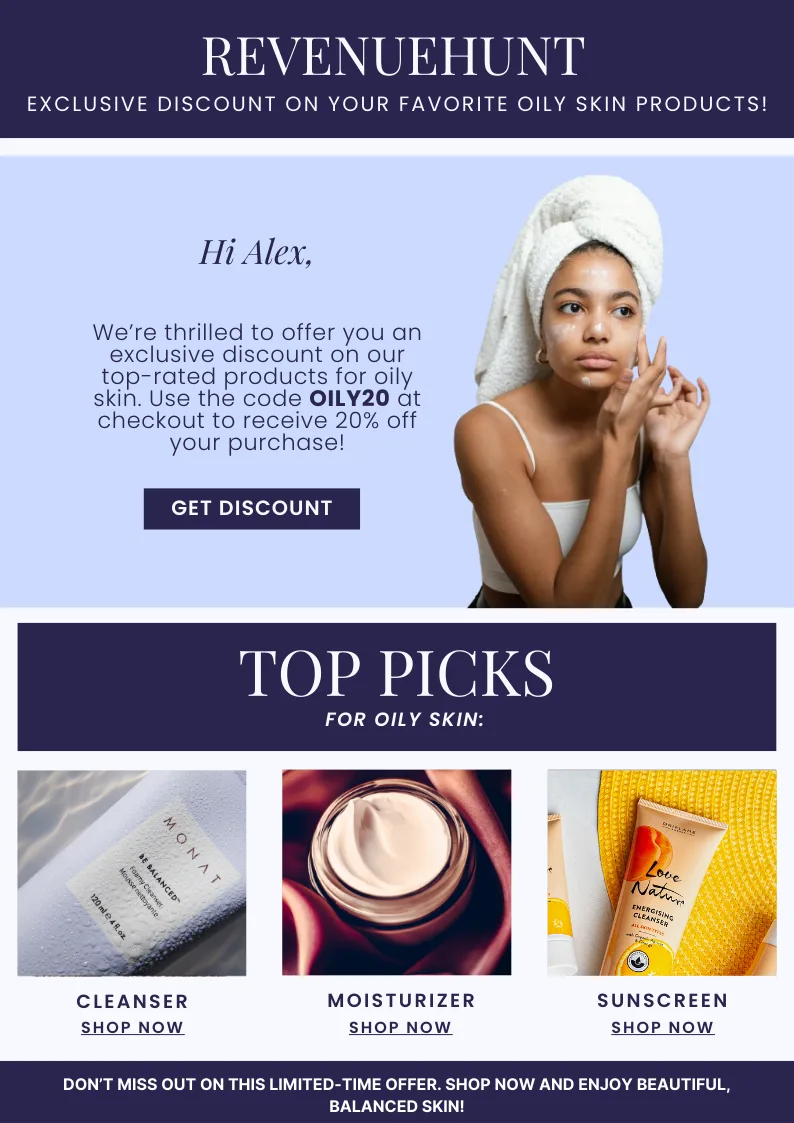
Fig. 05 Day 7 email: a discount on the recommended products. Stays inside the segment, so the discount lands as a closing nudge rather than a generic blast.
You replicate this pattern for each major skin-type and concern combination. The same three-template structure (intro, social proof, then discount) works across every segment; only the product references and ingredient explainers change. For the discount layer specifically, see product quiz discounts: the conversion playbook.
Frequently asked questions
Which platforms support direct Mailchimp integration?
Shopify Legacy, WooCommerce, Magento, BigCommerce and the Standalone version of the RevenueHunt app. The Built for Shopify version doesn’t currently support direct Mailchimp connection. For stores on Built for Shopify, the recommended alternative is Klaviyo (which works on every platform including Built for Shopify) or Shopify Flow for the Shopify-native automation layer.
Why does Mailchimp only accept email, name and customer tags from the quiz?
The Mailchimp API limits the fields RevenueHunt can sync to email, name and tags. Detailed quiz answers, recommendations, phone numbers and custom field data don’t flow directly. The workaround is to use customer tags as data proxies: tag every quiz answer that should influence segmentation, and the tag combinations on each Mailchimp profile carry the same information detailed answers would. A typical quiz produces 5-10 tags per completion, which gives Mailchimp plenty of segmentation precision.
Should I use Mailchimp or Klaviyo with my product quiz?
Both work; the choice depends on your existing stack and your segmentation needs. Mailchimp is the better fit for stores that already use Mailchimp, want simpler pricing, and need the basic segmentation-and-automation toolset. Klaviyo is the better fit for ecommerce-heavy stores that want deeper integration (more profile fields, behavioural triggers, predictive scoring, SMS) and have the budget for it. If you’re on Built for Shopify and don’t already have Mailchimp, Klaviyo is the right default.
Does the Mailchimp connection respect marketing consent collected in the quiz?
The default subscriber status you select in the Connect tab applies to every new lead. For EU GDPR setups, choose “pending” status and configure a confirmation email in Mailchimp’s audience settings. That implements double opt-in. For the broader consent-design playbook including question placement and wording, see smart ways to ask for marketing consent in a product quiz.
Can I send detailed quiz answers to Mailchimp another way?
Three workarounds:
- Webhooks: configure a webhook in the Quiz Builder to push selected fields to Mailchimp’s API directly. Requires developer setup.
- CSV export: download responses from Metrics → Responses and import to Mailchimp manually. Works but loses the real-time sync.
- Zapier: available on WooCommerce, Magento, BigCommerce and Standalone, route quiz data via Zapier with additional field mappings.
Where this fits
Mailchimp is one of three primary post-quiz email paths RevenueHunt supports: Mailchimp, Klaviyo and Shopify Flow. Pick the one that fits your existing stack and your segmentation needs. For most ecommerce stores, Klaviyo is the strongest default; for Shopify-native simplicity, Shopify Flow wins on cost; for stores already in the Mailchimp ecosystem, this guide is the path.
For the broader segmentation chain, see how Klaviyo segmentation unlocks once zero-party data lands in profiles. For Shopify Flow, see how to automate post-quiz emails using Shopify Flows. For the customer-tag layer all three paths depend on, see how to use customer tags in product quizzes. For the foundations of the quiz itself, see how to build a successful product recommendation quiz. For an Omnisend setup, see Omnisend quiz integration, and for the HubSpot CRM path, see HubSpot quiz integration.
Install RevenueHunt: Recommender Quiz for Shopify and start segmenting your first Mailchimp campaign today. Free plan available.
Free tools & data
Put these benchmarks to work on your own store.
Free tool
Quiz ROI calculator
Estimate the extra revenue and ROI a product recommendation quiz could add to your store. Built on real data, no email required.
Calculate your ROIFree report
Ecommerce quiz benchmark report
How product recommendation quizzes really perform: conversion by category, AOV uplift, and completion, from 45M+ real quiz responses.
Read the report

Most shoppers leave because they can't find the right product