HubSpot quiz integration: send & segment leads
How to connect a product recommendation quiz to HubSpot: setup paths for Shopify and other platforms, the data sent, list segmentation, and workflows.
Quick answer
To send quiz leads to HubSpot, connect RevenueHunt to your HubSpot account and each completed quiz response syncs automatically: the shopper's email, the answers they chose, the tags the quiz assigned, and the products it recommended all land on the HubSpot contact as custom properties. No Zapier, no CSV exports. From there you build active lists and list-based workflows that segment and email people based on those properties.
A product recommendation quiz captures zero-party data while shoppers are actively engaged: stated preferences, skin types, goals, gift recipients, budget bands. HubSpot turns that into segmented lists, scored leads, and automated nurture flows. Wired together, the two run as one customer segmentation and lead generation quiz pipeline.
This guide covers the exact setup paths, the data fields that land on the contact record, and the platform differences you need to know before you wire it up.
What you'll learn
- →How to connect HubSpot to a quiz on Built for Shopify, Shopify Legacy, WooCommerce, Magento, BigCommerce, and Standalone.
- →Which contact fields and custom properties auto-create in HubSpot when a shopper finishes a quiz.
- →Where list segmentation lives, and which platforms don't support it inside the app.
- →How to build a segmented HubSpot list and a list-based email workflow from quiz answers.
- →How to insert quiz-answer personalisation tokens into HubSpot email templates.
Why pair a quiz with HubSpot
Quizzes capture interest at its peak: the moment someone is actively choosing. HubSpot handles what happens next: segmentation, scoring, nurture. Three things change when you connect them:
Zero-party data lands on the contact record automatically. Every answer the shopper selects, every tag the quiz assigns, every product the quiz recommends ends up as a custom property on the HubSpot contact. No spreadsheet exports, no Zapier middle layer.
Segments stay accurate by themselves. Active lists update as new quiz responses come in, so “oily skin + under £40 budget” is always the current set, not a snapshot from last week.
Personalisation tokens make the follow-up email match the quiz result. The product the quiz recommended is the product the welcome email features.
Why personalised follow-up converts
71%
of high-performing quizzes collect email; 75% make it required (RevenueHunt platform data, 45M+ responses)
10.6%
conversion rate when the quiz uses a single results page versus 7.1% when it splits across 11+ pages
3–5x
revenue uplift on targeted versus untargeted emails (McKinsey)
Setup paths by platform
The connection lives in different places depending on which version of the app you run. The trigger and the data sent are the same; the UI is not.
| Built for Shopify and Shopify Legacy | WooCommerce, Magento, BigCommerce, Standalone | |
|---|---|---|
| Where you connect | Quiz Settings > Integrations | Quiz Builder > Connect tab |
| Connection scope | Store-level (authorise once) | Per-quiz |
| Per-quiz opt-in | Required (disabled by default) | Automatic on authorise |
| In-app "Select a list" dropdown | Available | Not available (segment in HubSpot) |
Built for Shopify (and Shopify Legacy)
The HubSpot connection is store-level: you authorise once for the whole store, then opt each quiz in.
- Open Quiz Settings > Integrations.
- In the Mailing & CRMs section find the HubSpot card and click Connect.
- HubSpot’s authorisation page opens. Pick your HubSpot account and click Choose Account.
- Review the requested scopes and click Connect app.
- You’re returned to the app. The HubSpot card now shows Connected with your Portal ID.
After the first connection HubSpot is disabled on each quiz by default. For every quiz where you want leads to flow through, open that quiz’s settings and tick Enable HubSpot for this quiz, then Save.
WooCommerce, Magento, BigCommerce, and Standalone
The connection is per-quiz and enabled automatically the moment you authorise.
- Open the quiz in the Quiz Builder and click the Connect tab.
- Find the HubSpot integration and click Connect.
- A new tab opens for HubSpot authorisation. Pick your HubSpot account.
- The confirmation page returns; the quiz is now wired up.
To disconnect, return to the Connect tab and click Disconnect.
Heads-up for Shopify merchants: if you build a new quiz after the initial connection, remember to tick Enable HubSpot for this quiz in that quiz’s integration settings. The store-level authorisation does not auto-opt new quizzes in.
What lands on the HubSpot contact
The sync fires when a shopper finishes the quiz and provides an email address. The email is mandatory: without it, no contact, no properties.
Each completed response sends:
Standard contact fields
emailfirstname,lastnamephone(when collected)
Quiz-specific custom properties (naming convention quiz_{id}_{field})
quiz_{id}_response_id— unique response identifier, the workhorse for list segmentationquiz_{id}_quiz_namequiz_{id}_result_refandquiz_{id}_result_page_namequiz_{id}_created_at— completion timestampquiz_{id}_tags— every tag the quiz logic assigned to this respondentquiz_{id}_variable_scores— variable values (skin-type score, fitness score, etc.)quiz_{id}_answer_by_block_{block_ref}— per-question answer textquiz_{id}_choice_{choice_ref}— boolean per choicequiz_{id}_tag_{tag_name}— boolean per tagquiz_{id}_products— names of recommended productsquiz_{id}_products_count
You don’t have to create any of these in HubSpot in advance. The app creates them automatically the first time a response is posted.

Fig. 01 Custom quiz properties on a HubSpot contact record. The integration creates these properties automatically on the first synced response; no manual schema setup in HubSpot required.
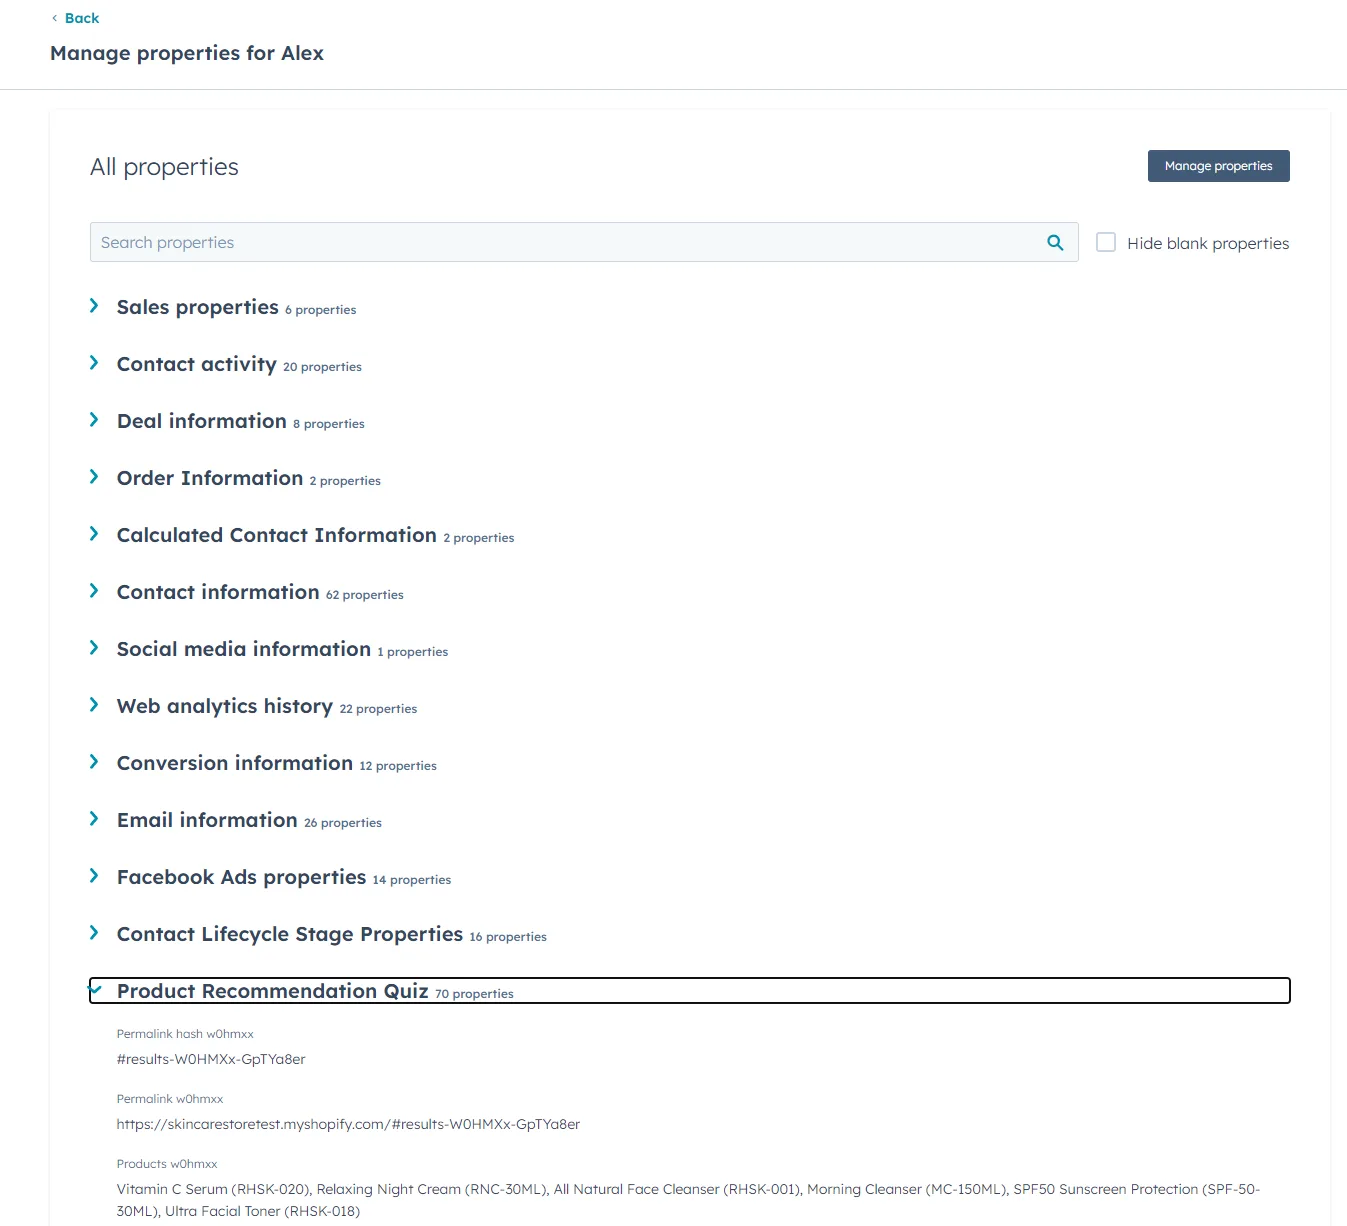
Fig. 02 The Product Recommendation Quiz section under custom properties on the contact card. Every quiz answer, tag, variable score and recommended product surfaces here for the sales and CS teams to reference.
List segmentation: in-app versus HubSpot-side
There are two ways to get a contact into a HubSpot list. Which one is available depends on the platform.
| Approach | Built for Shopify and Shopify Legacy | WooCommerce, Magento, BigCommerce, Standalone |
|---|---|---|
| Pick a HubSpot list on the email question | ✓ Email block settings include a Select a list dropdown | ✗ Not available; the dropdown does not appear |
| Build a HubSpot list from custom properties | ✓ Works everywhere; recommended for behaviour-based segments | ✓ The only option |
If the in-app dropdown doesn’t show your lists, the list was likely created after the integration was authorised. Open Quiz Settings > Integrations and click Reconnect to refresh the list catalogue.
Build a segmented HubSpot list from quiz answers
This is the universal path: it works on every platform and gives you finer control than the in-app dropdown.
- In HubSpot, open Contacts > Lists.
- Click Create List (top-right).
- Choose Active List (recalculates as new responses come in) or Static List (a frozen snapshot).
- Add filter criteria on the custom properties the quiz created — for example
quiz_12345_tag_oily_skin is trueANDquiz_12345_variable_scores contains "budget:under_40". - Name the list (e.g. Oily skin · under £40) and Save.
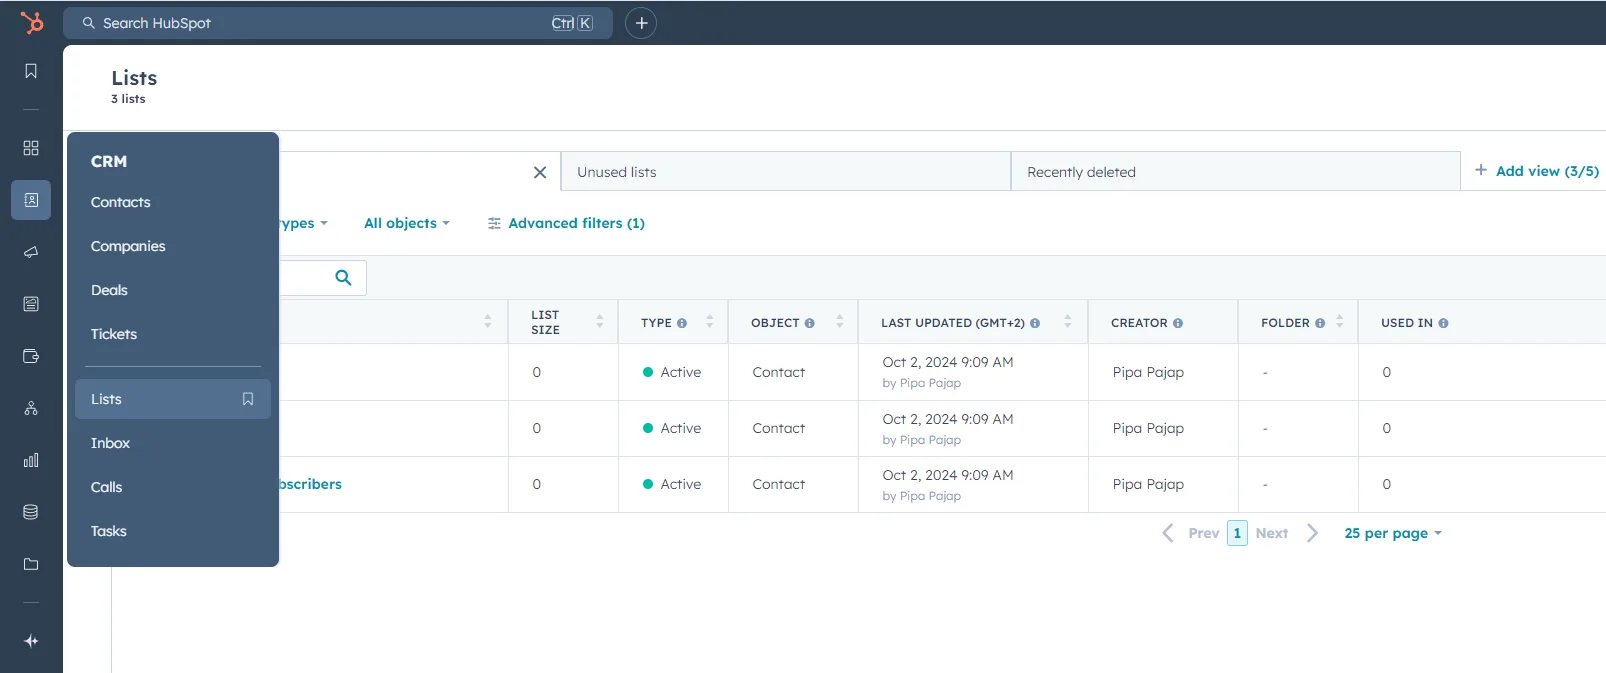
Fig. 03 The HubSpot segmented-list builder. Filter contacts on the quiz custom properties to define a list once; HubSpot then keeps the membership live as new quiz completions arrive.

Fig. 04 List criteria composed from quiz properties. Combine tag, variable-score and answer-choice conditions (skin type AND budget tier AND chosen concern) for precise segmentation.
Build a list-based workflow
Once the list exists, the workflow does the actual sending.
- In HubSpot go to Automation > Workflows.
- Click Create workflow > From scratch.
- Choose List-based and pick the list you just created.
- Add an Email action; if you don’t have the email yet, create it under Marketing > Email > Create email.
- Insert a Delay between steps (e.g. 1 day, then 3 days, then 7 days).
- Customise each email using personalisation tokens for the quiz answers (next section).
- Test the workflow and turn it on.
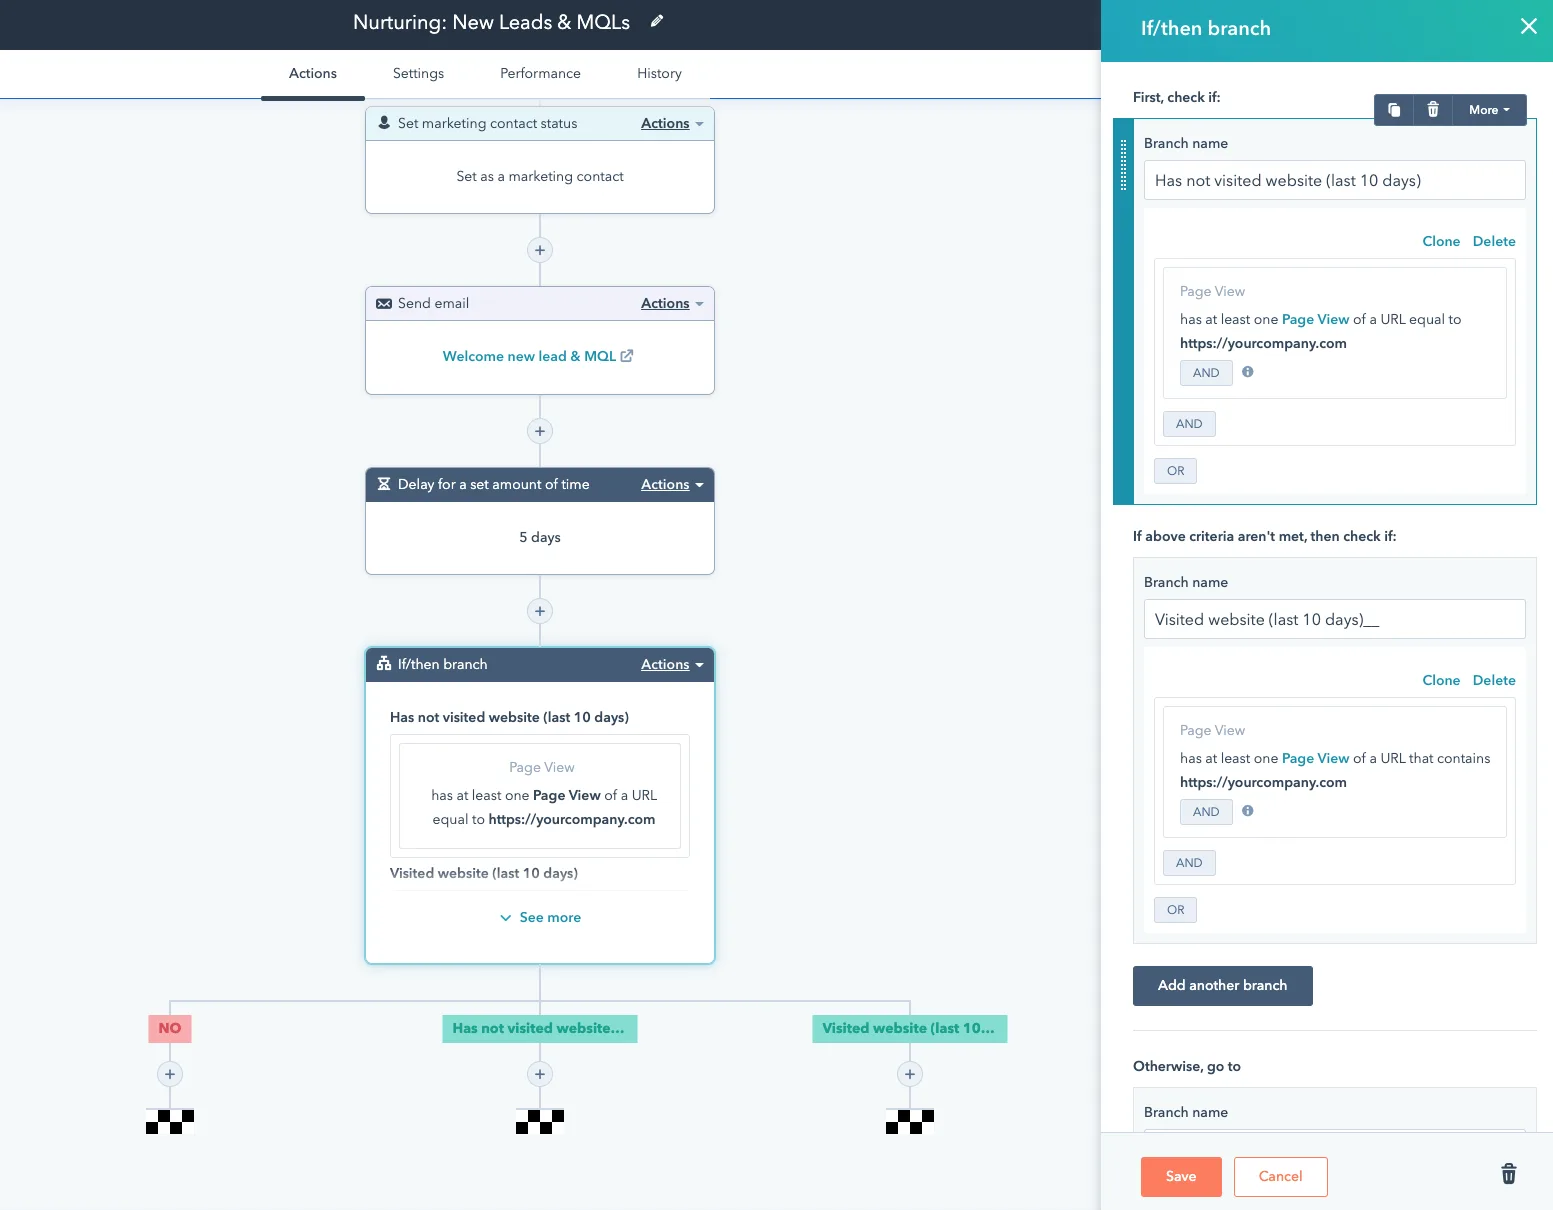
Fig. 05 The HubSpot Workflow builder triggered on list entry. Each list maps to a sequence of personalised actions: emails, deal creation, sales-rep assignment, internal notifications.
Personalise emails with quiz-answer tokens
Quiz custom properties behave like any other HubSpot contact property: they’re available as personalisation tokens in any email template.
- In the email editor click Insert > Personalization Token.
- Find the quiz property you want — for example
quiz_12345_productsorquiz_12345_result_page_name. - Drop the token into the subject line, the body, or both.
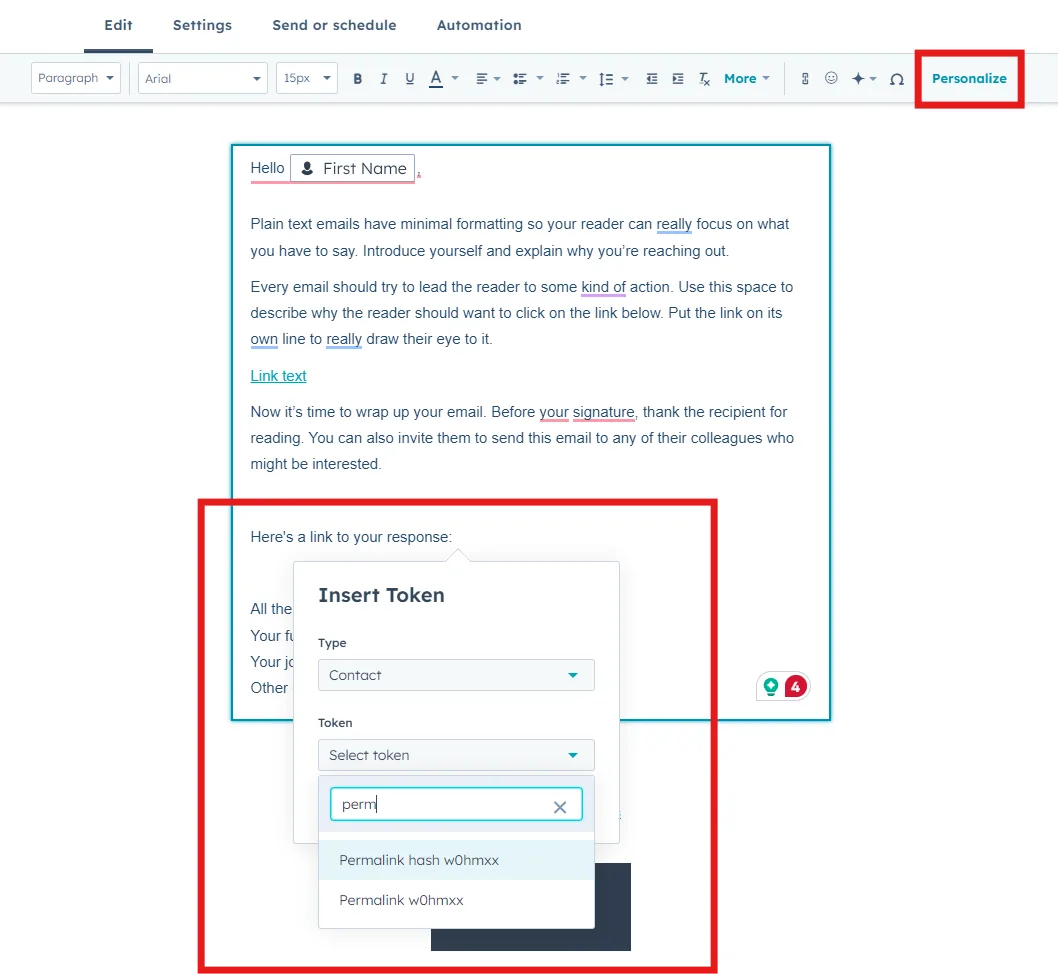
Fig. 06 The Personalization Token picker inside the email editor. Drop quiz properties (recommended products, result-page name, specific tags) into subject lines and body copy so the email reads as a continuation of the quiz, not a blast.
Use Preview as a specific contact to confirm the token renders for a real quiz respondent before you turn the workflow on.
Fig. 07 Email preview with the personalisation tokens resolved to a real respondent's answers. Use Preview as a specific contact to confirm the token renders before turning the workflow on.
Note on images: HubSpot personalisation tokens render text, not images. If you want the email to show the recommended product image, you typically need to attach that data through HubSpot’s product catalog or use programmable email; you can’t drop a product image straight from a quiz token.
Marketing consent and the HubSpot sync
The HubSpot sync sends the contact details and the answers. It does not, on its own, set the marketing-subscription status on the HubSpot contact. If you need explicit consent on record before nurturing:
- Add a marketing-consent question to the quiz (see marketing consent in your quiz).
- The shopper’s answer arrives as a quiz tag (e.g.
consent_yes). - Build a HubSpot list filtered on that tag and use only that list to feed the nurture workflow.
This keeps non-consenting contacts out of marketing sends even though their data is on the contact record.
When to use HubSpot versus Klaviyo or Shopify Flow
HubSpot is the right fit when CRM, lead scoring, and sales follow-up matter as much as email — typical for B2B catalogues, considered-purchase niches, or merchants who need a single contact record across email and a sales pipeline. For pure-play DTC where the goal is transactional email and SMS at scale on Shopify, Klaviyo generally wins on segmentation depth and Shopify-native triggers. For tag-driven automations confined to Shopify itself (order tags, customer tags, fulfilment routing), Shopify Flow keeps the logic where the orders live.
FAQ
Does the HubSpot integration work the same on Built for Shopify and Shopify Legacy?
The setup path is identical (Quiz Settings > Integrations > HubSpot) and so are the fields sent. The only quirk to remember on both is that HubSpot is disabled per quiz by default after you authorise; you tick Enable HubSpot for this quiz to opt each quiz in.
Can I send leads to HubSpot from WooCommerce, Magento, or BigCommerce?
Yes. The connection lives under Quiz Builder > Connect, and once authorised the quiz starts sending leads automatically — no per-quiz toggle. The only feature you don’t get is the in-app Select a list dropdown on the email block; you segment inside HubSpot instead.
What if the email is optional in my quiz?
The HubSpot sync only fires when an email is captured. Responses without an email don’t create contacts. If lead capture is the whole point of the integration, make the email question required and place it before the results page — platform data shows 75% of high-performing quizzes require email.
Do I need to create the custom properties in HubSpot first?
No. The integration auto-creates every quiz_{id}_* property the first time a response is posted, including the per-question answer fields and per-tag booleans.
Why don’t my HubSpot lists show up in the in-app dropdown?
Two common causes. First, the lists were created after the integration was authorised; reconnect via Quiz Settings > Integrations > Reconnect. Second, you’re on WooCommerce, Magento, BigCommerce, or Standalone — the in-app list picker is Shopify-only. Build the lists from custom properties inside HubSpot instead.
Next steps
- Decide upstream what data the quiz must capture: marketing consent in your quiz before HubSpot starts emailing.
- Use the answers and tags to drive segments: customer tags in product quizzes.
- Compare with Klaviyo zero-party data and Shopify Flow automations before you commit to one stack.
- Avoid the design traps that kill quiz conversion: product quiz mistakes.
- Track the right numbers post-launch: product quiz metrics.
- New to quizzes? Start with how to build a successful ecommerce quiz.
Free tools & data
Put these benchmarks to work on your own store.
Free tool
Quiz ROI calculator
Estimate the extra revenue and ROI a product recommendation quiz could add to your store. Built on real data, no email required.
Calculate your ROIFree report
Ecommerce quiz benchmark report
How product recommendation quizzes really perform: conversion by category, AOV uplift, and completion, from 45M+ real quiz responses.
Read the report
Most shoppers leave because they can't find the right product